Hello. How may we help you?
-
Getting Started
- Configuring Your Management Module
- Create & Configure A New Organization
- Creating a Customized Address
- Mastering Advanced Search and Filters
- Understanding Your Organization's Homepage
- Understanding Role Function
- Dashboard Overview: Key Insights for Organizational Decision-Making
- Changing The Language
- Changing Your Password
- Editing Your Profile
- Feedback and Requests
- Frontier.cool Privacy Policy
- Managing Your Profile Menu
- Are all of my digital fabrics shared publicly?
- Does Frontier.cool’s TextileCloud™ offers a free trial plan?
- How do I change the language?
- How do I send feedback or make a request?
- How does Frontier.cool protect my privacy and keep my data secure?
- How does Frontier.cool’s TextileCloud™ accurately generate physical properties?
- How does Frontier.cool’s TextileCloud™ generates accurate texture maps?
- Why can't I download other people's 3D material files?
- Why is my asset upload unsuccessful or canceled?
- How does Frontier.cool’s TextileCloud™ generates environmental impact data with Eco-Impactor™?
- Accessing and Copying a Shared Collection
- Adding Assets to Collection in the Workspace
- Creating and Accessing Collections
- Creating and Managing a Private Digital Library on an Embed Page
- Managing Collections
- Managing Your Workspace
- Sharing Assets and Collections
- Edit Your Collection’s Cover Image
- Attaching Files to Support Asset Information
- Copying Assets To Group or Workspace
- Creating 3D Materials
- Creating 3D Materials for Fabrics with Mesh
- Creating Assets
- Creating Assets by Smart Upload
- Creating Assets with APEXFiz File
- Creating Assets with Multiple Fabric Sides
- Customizing Asset’s Cover Image
- Deleting Assets
- Digital Drape Overview
- Downloading 3D Material Files
- Editing An Asset
- Exploring the 3D Viewer
- Export Digital Library Data to Excel
- Importing TextileCloud™'s 3D Material Files Into CLO3D
- Integrate Your System With TextileCloud™ Using APIs (Application Programming Interfaces)
- Mass Data Update and Management
- Mass Upload Data
- Mass Upload Data with Multiple Fabric Sides
- Merge Material for Asset with Face and Back Side
- Navigating the Asset Library on Frontier.cool
- Printing an Asset
- Printing and Customizing Your QR Code Label
- TextileCloud™'s Supported 3D Material Files
- The Asset Library
- Understanding Texture Maps
- Updating Fabric Images with QR Code Labels
- Uploading Pre-Scanned Images
- Best Practices for Filling Mass Upload's Excel Template
- Frontier.cool's Fabric Physical Properties
- Unlock the Power of Eco-Impactor®
- Exploring the Key Features of the Thread Board on Frontier.cool
- Navigating Detailed Card Information in the Thread Board Module on Frontier.cool
- Navigating the Thread Board Module in Frontier.cool
- Start a DigitalThread™ Conversation
- Accessing Detailed Fabric Information on Frontier.cool
- Accessing Trade Events and Vendors on Frontier.cool
- Exploring the Sourcing Library Module on Frontier.cool
- Fabric Discovery and Information in the Frontier.cool Sourcing Library
-
開始使用
個人資料管理
團隊相關
工作區相關
Mood board 相關
布料資產相關
- 使用應用程式介面 (API) 將您的系統連接至 TextileCloud™
- 探索布料資產模組
- 如何操作布料資產模組
- 如何建立布料
- 如何使用智慧上傳建立布料
- 如何用上傳已預掃描影像建立布料
- 使用 APEXFiz 檔案建立數位資產
- 了解TextileCloud™所支援的 3D 布料檔案
- 如何建立3D布料
- 如何下載3D布料以供設計或生產流程所需
- 建立網格布料的3D Material
- 編輯您的數位布料
- 自訂布料資產的封面圖像
- 如何列印布料資產的Swatch
- 將布料資產複製到團隊或工作區
- 如何批量上傳以建立布料
- 如何大量更新布料資訊
- 了解紋理貼圖(6 Texture Maps)
- Digital Drape概覽
- 如何列印與客製布料的 QR Code 標籤
- 如何建立雙面或三層數位布料
- 時尚與紡織產業的永續轉型工具: Eco-Impactor®
- 如何刪除布料
- 探索3D檢視器: 布料採購、行銷和設計不可或缺的工具
- 如何使用QR Code標籤更新您的布料資訊
- 如何將TextileCloud™的3D布料檔案導入CLO3D
- 如何批量上傳雙面或多層布料
- 如何將正面布與背面布合併成雙面布
- 如何為布料新增附件使其資訊更為完整
- 如何將數位布料匯出成Excel檔
- Frontier.cool的布料物理數據介紹
- 如何填寫批量上傳的Excel模板
- 探索Frontier.cool的Sourcing Library 模組
- 探索Sourcing Library中的布料與相關資訊
- 了解Sourcing Library中布料的詳細資訊
- 了解Sourcing Library中的展會展示功能
- 如何註冊並登入 FabriSelect™
- 數位化您的布料採購流程-FabriSelect™
- 探索FabriSelect™ 的儀表板
- 如何使用FabriSelect™
- 如何用FabriSelect™ 建立和分享資料夾
- 如何在FabriSelect™ 建立會議記錄
如何將TextileCloud™的3D布料檔案導入CLO3D
簡介
TextileCloud™ 的 3D 檔案包含 6 種紋理貼圖:Base、Normal、Displacement、Roughness、Alpha、Metalness。然而,由於這當中的某些貼圖並非 .glTF 格式的標準內容,因此在導入 CLO3D 等設計工具時,需手動添加這些紋理貼圖。
💡小提示
開始前,請確保您已在 TextileCloud™ 中建立 3D 材質並下載 .glTF 檔案。
TextileCloud™ 產生的 .glTF 3D 檔案 包含物理屬性與6 種紋理貼圖,並封裝於 .zip 壓縮檔中。下載後,請先解壓縮 .zip 檔案。
🔗 請參閱以下指南:
📌 如何建立 3D 布料 👉 [點此查看]
📌 如何下載 3D 布料檔案 👉 [點此查看]
如何在 CLO3D 中導入 .glTF 檔案
- 打開 CLO3D,在 物件瀏覽器(Object Browser) 面板中點擊 [+Add] 按鈕。
- 選擇您從 TextileCloud™ 下載的 .glTF 檔案,然後點擊開啟。
- 或直接將 .glTF 檔案拖放至 CLO3D 軟體內,完成導入。
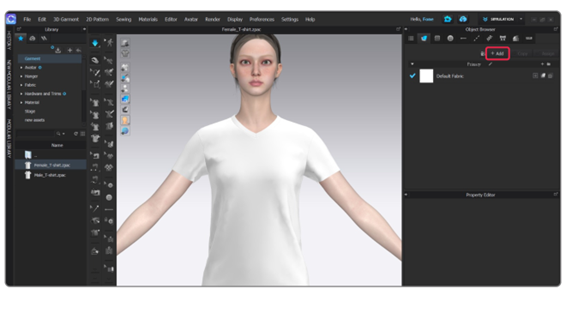
⚠️ 注意:.glTF 標準格式 僅包含 Normal、Base 和 Roughness 貼圖。
需手動添加 Displacement、Alpha、Metalness 等額外貼圖至 CLO3D。
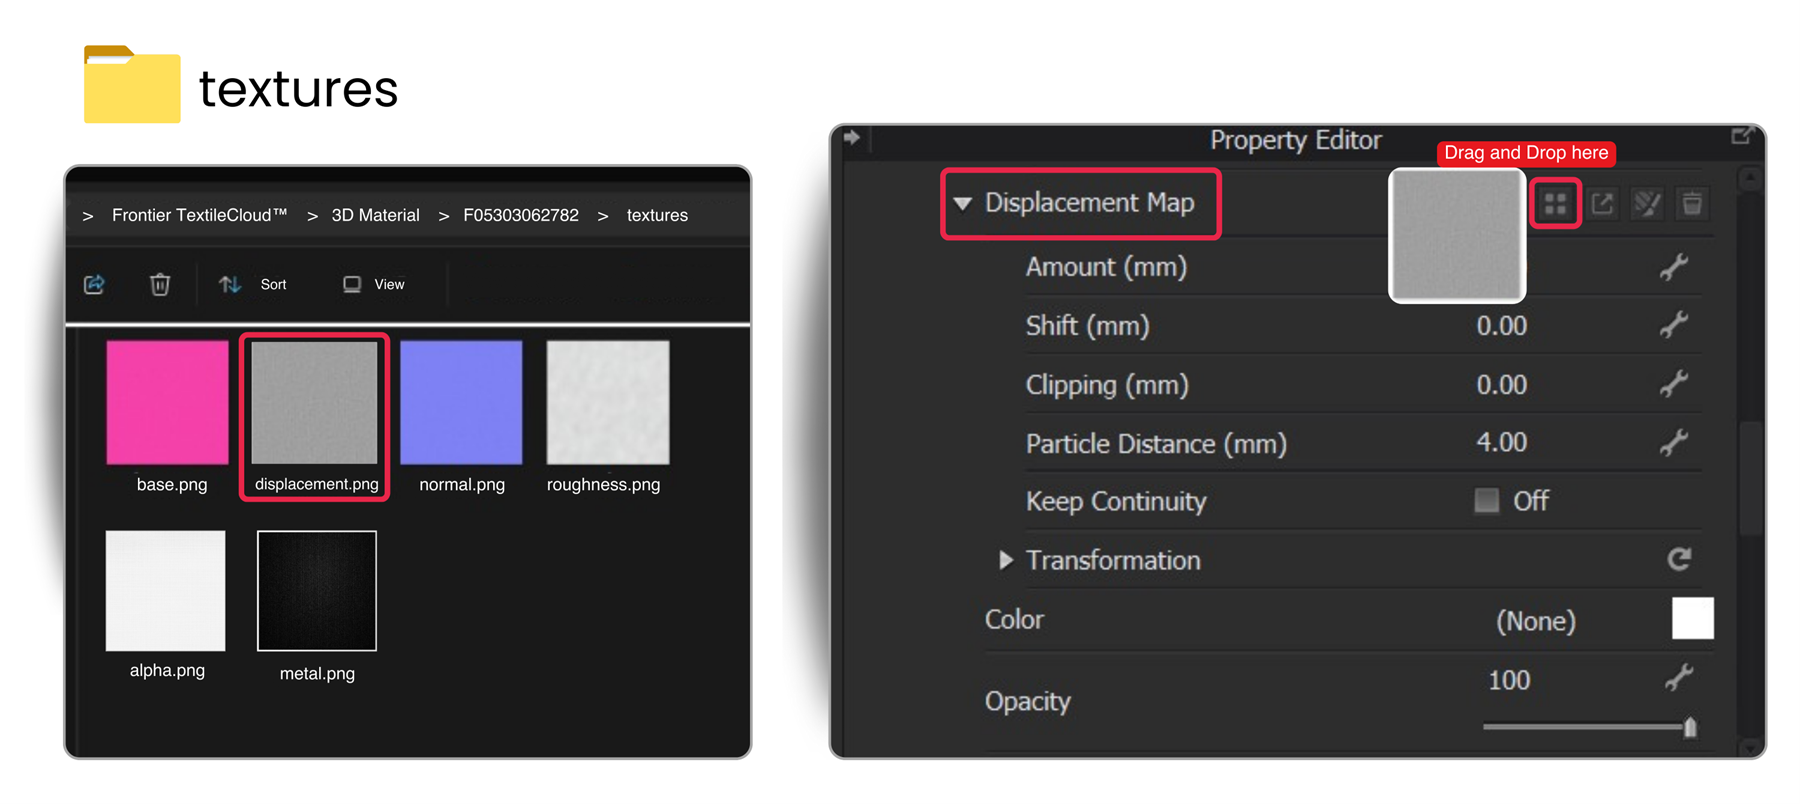
如何在 CLO3D 中添加 TextileCloud™ 的補充紋理貼圖
- 打開從 TextileCloud™ 下載的 .glTF 檔案,進入 [textures] 資料夾。
- 手動添加額外紋理貼圖(以 Displacement Map 為例):
- 拖放 [disp.png] 檔案 至 CLO3D 的 Property Editor(屬性編輯器) 面板內的 Displacement Map 欄位。
- 調整紋理參數(如需要):
- 可根據需求調整 數值、位移、剪裁 等屬性,以獲得最佳視覺效果。
結論
透過整合 TextileCloud™ 的 3D 檔案與紋理貼圖,您可以輕鬆地將其導入 CLO3D 等設計軟體,提升使用體驗與設計靈活度。透過本指南的步驟,設計師可以輕鬆應用紋理貼圖,優化設計流程,進而提升作品的視覺品質與真實感。
Store locator
-
Heading
Add address
-
Heading
Add address
-
Heading
Add address
Example product title
Size
Color
Quantity